Working With Images
There are two very different color modes used when creating digital images. The RGB mode is used primarily for screen images. The CMYK mode is used for print. For our purposes in this tutorial, we will use RGB mode.
The tutorials will be printed on desktop printers, which usually operate in the RGB color space. If we were sending the files to a professional print shop, we would create the images and colors in CMYK.
RGB images can be saved as "tiffs" at a higher resolution (200 to 300 dpi) for print. They can later be resized to a screen resolution of 72 dpi for web use.
Photoshop Tips
Organizing Files
Inserting Anchored Images
Defining Alt Tags
PhotoShop Tips
- Have Monitor (Display) at high resolution setting when doing your screen shots.
- Paste screen shots into PhotoShop > Crop Image > Resample.
- Keep size consistent when possible.
- Resample to 200 dpi.
- Set rectangle selector box to "fixed" size (ie 3.5" x 2.75").
- Crop and run the "Unsharp Mask Filter" 2 times using:
Amount=8%, Radius=2, Threshold=0.
- Confirm that Color Mode is set for RGB.
- Put words and arrows on separate layers and label layers.
- Save layered file as a "psd". Put in "PSD" folder.
- Flatten file and save as a Tiff. Put this file in an "images" folder.
- This flattened RGB tiff can be used for documents printed on desktop printers. If printed professionally it must be converted to a CMYK tiff.
- To used these images for a website, change the resolution to 72 dpi and optimize them as "png" or "jpeg" images.
Organizing Files
- Start with a "Development Folder" called "jobname_dev" named for the job. All folders are kept in this main folder.
- Your screen shots will go into a "Screen Shots Folder" to be accessed if you need to go back and use them for any reason. Your original PhotoShop psd files will go into a "PSD Folder". The PDF files you make will go into a "PDF Folder". All folders will be kept in the main "Development Folder".
- Create a "Job Folder" called "jobname_date" and keep this folder inside of the "Development Folder" also.
- Your InDesign file will be saved inside of your "Job Folder".
- The Tiff images you created will go into an "Images" folder you will create within the "Job Folder".
- The images are placed from this "Images" folder into the InDesign file. This links them to your InDesign document.
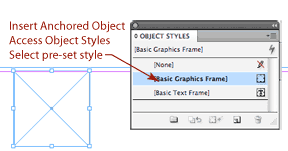
Inserting Anchored Images
Create an Object Style that will consistently position your graphic where you want it. You can add a border and also space underneath and/or above.

- Place curser in text block
- Go to Objects > Anchored Objects > Insert
- Select Anchor Using Selection arrow
- File > Place (Control D) your image
- With Selection arrown on graphic, right click to size.
- Choose "Fitting" and "Fit Frame to Content"
- Make sure your Caption is a separate text block under your image
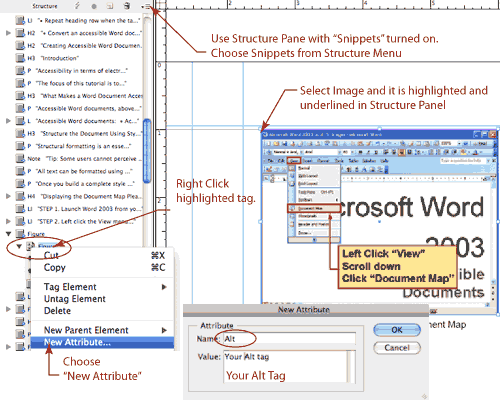
Defining Alt Tags

- Open Structure Pane
- Select Graphic
- Right click highlighted/underlined icon in Structure Pane
- Choose "New Attribute" from menu
- Type "Alt" in the "Name" area and your description in the "Values" area.
- Click OK.
|
![]() ACDowd Designs
ACDowd Designs